


The catalytic converter plays a crucial role in meeting emission standards for BMW vehicles. This essential component helps in converting harmful gases produced during fuel combustion into less harmful substances before they are released into the atmosphere. Over time, the catalytic converter can become clogged or damaged, negatively impacting your vehicle’s performance and increasing toxic emissions. Thus, replacing it becomes not just a necessity for compliance but also for optimal driving experience.
In this guide, we will provide you with a detailed, step-by-step approach to replacing the catalytic converter on your BMW. Whether you are a seasoned mechanic or a novice DIY enthusiast, following these instructions will ensure that you successfully complete the task while adhering to BMW’s engineering standards. Understanding the importance of each step will also provide insight into how the catalytic converter functions within your vehicle’s exhaust system, making you more knowledgeable about your car’s emissions and overall health.
Before we dive into the replacement process, it is essential to gather the necessary tools and parts. This preparation will help streamline the work and minimize any potential setbacks. With proper planning and execution, you can replace your BMW’s catalytic converter efficiently, reduce emissions, and improve the vehicle’s overall performance.
Identifying Symptoms of Catalytic Converter Failure in BMWs
Recognizing the signs of catalytic converter failure in BMW vehicles is crucial for maintaining optimal performance and compliance with emission standards. One of the first indicators is a noticeable decrease in engine performance. If you experience a lack of power during acceleration or a rough idle, it may be time to investigate issues related to the catalytic converter.
Another symptom to watch for is the illumination of the Check Engine Light on your dashboard. This warning can signify various problems, but in many cases, it is linked to the catalytic system. Using an OBD-II scanner can help identify specific error codes associated with catalytic converter failure.
Additionally, unusual sounds may point to catalytic converter issues. If you hear a rattling noise coming from the exhaust system, it could mean that the internal components of the converter are breaking down.
Also, keep an eye on fuel efficiency. A failing catalytic converter can lead to increased fuel consumption, as the engine struggles to perform efficiently. This decline in fuel economy can be a significant financial burden over time.
Excessive exhaust emissions are another critical sign. If your BMW emits a strong sulfur smell or produces visible soot and smoke from the exhaust, it’s essential to address potential catalytic converter problems immediately, as these emissions can harm the environment and violate emissions regulations.
By being aware of these symptoms, you can take proactive measures to diagnose and replace your catalytic converter, ensuring your BMW remains compliant with emission standards and operates smoothly.
Tools and Materials Needed for Catalytic Converter Replacement
Replacing the catalytic converter on your BMW requires specific tools and materials to ensure a successful emission system repair. Here is a comprehensive list of what you will need:
Tools:
- Socket Set: A complete socket set, including a ratchet and various socket sizes, is essential for loosening and removing the bolts that secure the catalytic converter.
- Wrench Set: Open-end or box-end wrenches will be required to access bolts in tight spaces, especially in older models.
- Torque Wrench: This tool ensures that nuts and bolts are tightened to the manufacturer’s specifications, which is critical for the emission system’s integrity.
- Oxygen Sensor Socket: If your BMW’s catalytic converter has an attached oxygen sensor, this specialized socket will help safely remove and replace it.
- Pry Bar: A pry bar may be helpful for loosening stubborn components that are in place due to rust or corrosion.
- Jack and Jack Stands: Lifting the vehicle safely is important for accessing the undercarriage. Always use jack stands for security.
Materials:
- Replacement Catalytic Converter: Ensure you have a compatible catalytic converter designed specifically for your BMW model for maximum efficiency and compliance with emission regulations.
- Exhaust Gasket: A new gasket is essential to prevent any leaks in the exhaust system after installation.
- Thread Locker: Using thread locker can help secure bolts and prevent them from loosening over time due to engine vibrations.
- Anti-Seize Compound: Applying anti-seize to the threads of the bolts will make future removal easier and prevent rust build-up.
With the right tools and materials, replacing the catalytic converter on your BMW can be a straightforward process, ensuring your vehicle meets emission standards and runs efficiently.
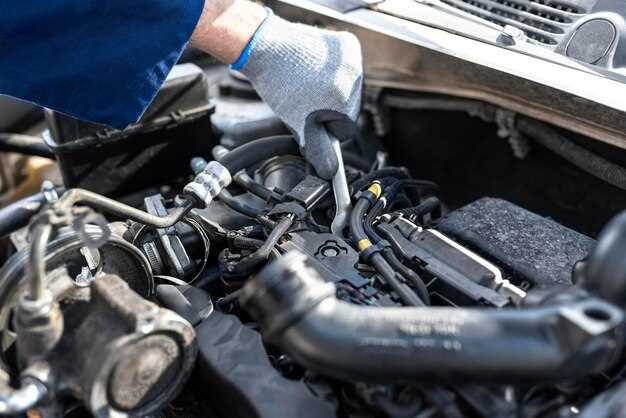
Step-by-Step Replacement Process for BMW Catalytic Converter
Replacing the catalytic converter in your BMW is essential to ensure proper emissions control and vehicle performance. Follow this step-by-step guide for a successful replacement.
Step 1: Gather Necessary Tools and Parts
Before starting the replacement, ensure you have the right tools including a socket set, wrenches, jack stands, and safety goggles. Also, acquire a compatible catalytic converter for your specific BMW model.
Step 2: Prepare the Vehicle
Park the BMW on a flat surface and engage the parking brake. Allow the exhaust system to cool down if the vehicle has been running. Lift the car using a jack and secure it with jack stands for safety.
Step 3: Locate the Catalytic Converter
The catalytic converter is situated along the exhaust system, usually between the exhaust manifold and the muffler. Identify its position in your vehicle’s layout for easier access.
Step 4: Disconnect Exhaust Components
Start by loosening and removing the bolts or clamps that hold the exhaust pipes connected to the catalytic converter. Use a penetrating oil if necessary to ease rusted bolts. Carefully detach connecting pipes to avoid damaging them.
Step 5: Remove the Old Catalytic Converter
Once the exhaust components are removed, unbolt the catalytic converter from its mounting points. Keep track of all nuts and bolts as you will need them for installation. Gently slide the old converter out from the exhaust system.
Step 6: Install the New Catalytic Converter
Position the new catalytic converter, ensuring alignment with the exhaust pipes. Secure it in place using the original bolts. Tighten them to the manufacturer’s specifications to avoid any exhaust leaks.
Step 7: Reconnect Exhaust Components
Reattach the exhaust pipes to the new catalytic converter. Ensure that each connection is tight and secured with clamps or bolts as needed. Check for proper alignment to maintain exhaust flow.
Step 8: Check for Emissions Leaks
Before finishing, start the vehicle and allow it to reach operating temperature. Inspect all connections for leaks by listening for exhaust sounds and checking for any visible emissions. Address any issues immediately.
Step 9: Dispose of the Old Catalytic Converter
Follow local regulations for the disposal of the old catalytic converter, as they contain precious metals and can be hazardous to the environment. Recycling is often the best option.
Step 10: Test Drive the Vehicle
After confirming there are no leaks, take the BMW for a test drive. Monitor performance and ensure that the check engine light does not illuminate. This confirms that the new catalytic converter is functioning correctly.

